
Lost Wax Process
All of the Nataji® bronze sculptures are produced using the lost wax method, which has been around for thousands of years. Lost wax casting is a labor-intensive procedure and it can take between 8-12 weeks to produce a finished bronze sculpture. We have provided an illustrated description of this process.
Step 1: Original Sculpture

“Baby Buddha” original clay sculpture, before going into the kiln
After the artist has sculpted the original sculpture, which can take from 2 months to a year to create, it is then ready to be molded. The mold maker will study the sculpture and determine how it will be sectioned or "laid up" for mold making. Complex molds will require the original artwork to be cut into smaller manageable pieces. The detail of the original must be captured and transferred in the mold, if not, they will be difficult to replace in any other step. The process of mold making takes about 2 weeks to complete.
Step 2: Mold Making

Inner and outer mold in process on “Temple Goddess”

Mother Mold” with original sculpture of “Ganesha”
The original sculpture will be prepared for molding by applying a release agent to the sculpture, which allows for easy removal of the polyurethane rubber mold. Afterwards, the Mold Maker will apply the first coat of rubber. Once the rubber has set, additional coats must be applied and "keys" will be placed in the rubber to ensure proper positioning of the mold.
When the rubber is thoroughly set, an outer mold or "Mother Mold" is applied to support the rubber for the wax pouring process. We use fiberglass as the outer "Mother Mold" due to being lightweight, strong and durable. A release agent is applied on one half of the rubber mold then the fiberglass is laid down on the rubber, followed by the resin and allowed to dry. Depending on the size of the mold and the strength needed, several coats may be applied. The process is repeated on the other half. The outer mold is removed and the rubber gently pulled back to enable removal of the original sculpture.
Step 3: Wax Casting
Making a wax from the “Mother Mold” is the next step in the casting process. Lost wax casting is a labor-intensive procedure that takes 8-10 weeks to produce a finished bronze sculpture. The completed mold, having already been prepped, is now ready for the wax. The mold is opened up and the first coat of wax is painted into the mold to capture all the fine details of the artist's masterwork. The mold is put together and more wax is poured in. It is then rotated until an even, thin coating is achieved. Once it has cooled, a second coat is applied and rotated to achieve a thickness of about 3/16”. The excess wax is poured out. After the wax has cooled, the "Mother Mold" is removed followed by the rubber mold.
Step 4: Wax Chasing
“Baby Buddha” in wax
Chasing is the process of cleaning up the wax for casting. The seam lines are removed and the wax pieces are fitted for alignment. Then the register marks are put in, followed by the final wax inspection. The artist makes any necessary corrections and signs and numbers the wax cast at this point.
Step 5: Spruing and Gating
To allow the bronze to flow evenly into the form, wax rods are attached to the sculpture. These rods are called sprus or gates. A large cup is attached at one end.
This cup will receive the molten bronze when poured into the form. The placement of the gate system enables molten bronze to flow through these areas allowing gases to escape through smaller bars called vents.
Step 6: Ceramic Shell

A completed ceramic shell of “Baby Buddha”, hanging upside down
The wax is then dipped in a liquid binder solution to create a shell. This material is called a slurry, wherein fine silica sand is applied to the wax sculpture. Each coating must dry completely prior to the next coating. The number of coats applied to a sculpture is determined by the size and weight of the piece. The heavier the sculpture, the thicker the shell must be to support the metal. The slurry coats the inside and outside of the wax allowing the sculpture to be hollow.
Step 7: Bronze Casting
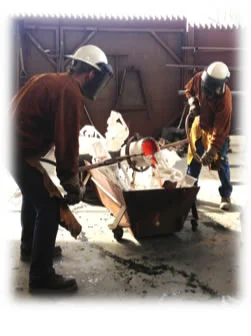
Pouring metal into the shells
The ceramic shell is removed from the shelling room and placed in a kiln, with cup side down. The hot kiln bakes the silica into a hard shell causing the wax to melt and run out. (Thus: “lost wax” casting). Now all that remains of the original work is the negative shell. The ceramic shell is cooled, then the vent tubes are checked, and once again the shells are heated up and transferred to a pouring pit. The Bronze is melted in a crucible to 1900 to 2100 degrees. The molten bronze is then poured into the hollow shells of the sculpture and allowed to cool and solidify.
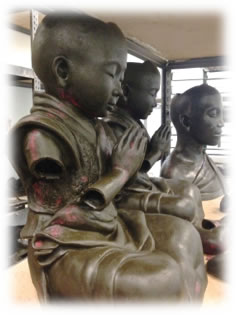
Step 8: Devesting

Partially devested sculpture of “Little Monk”, with gating still attached
The shell material is now removed inside and out, and the unfinished bronze casting is revealed. It is then sandblasted to remove any remaining shell material from the intricate details of the casting.
Step 9: Welding

“Baby Buddha” sculpture before welding
If the original sculpture were sectioned into multiple pieces, it would now be carefully fitted and reassembled. A visual inspection is done to check for any casting inclusions. If there were any surface defects, these would also be repaired at this time. All sections of the casting are welded together with great care and attention to alignment and thoroughly inspected by the artist.
Step 10: Metal Chasing

“Baby Buddha” sculpture after sandblasting
The sculpture is treated with several different polishing and detail tools to remove any sign of welding or casting defects and to prepare the bronze for the patina.
Step 11: Patination

“Spirit Guide” in patina
The patina is the finished color on the bronze sculpture, an art in itself. The bronze is heated up using a torch and various pigments such as ferrics, cuprics, and oxides, which are either sprayed on or hand applied in several coats to achieve the desired look or coloring. After cooling, the finished piece is then lacquered for protection and then given a coating of wax to preserve the finish.
Step 12: Attaching a Base

“Baby Buddha” on his base
If needed, a custom cut and polished stone base is specially mounted to the bronze to
best display the sculpture.
Step 13: Crating & Shipping

The sculpture is carefully and securely packaged in a custom made wooden crate for safe shipping.
Learn about the history of bronze and lost wax casting